The master plan is to convert a single car garage into a fully functional workshop. The rough plan is to renovate the workbench, fix a small assembly table (working on the table legs) and organise my tools a bit by building custom designed tool boards.

I'll walk through the top three parts of my project.
The workbench
I bought the workbench from an older gentlemen not far from where I live. He told me that his grandfather used to use it for all his woodworking.

It doesn't have a straight edge at the moment so that needs to be adressed. There are also a few other things that needs to corrected.
- A hinge needs to be repaired, the wood around the hinge has completely disintegrated so I need to replace part of the hatch to make it work again.
- A new table top needs to be fitted. I plan to do it the easy way and buy a glued joint board and cut it to size. Still need to do some work below it to make it sturdy and nice. Also the sides needs to be covered in new fresh wood.
- The drawers below it needs to have some wheels added to make them easier to use. It's a pain in the b*** to open and close them at the moment. There is however not very much space so the need to be sunken into the drawer itself somehow.
- Both vices needs to be cleaned and lubricated.
And much more...
Tool boards
I got motivated by an unknown YouTuber (that did something like this, https://www.youtube.com/watch?v=4fKBZ-H9StM) on how to create a highly versatile wall tool board. The design is dead-easy, simply a set of plywood strips cut with a french cleats. Each tool holder will the be hangable and moveable as easy as eating ice cream. I eat a lot of ice cream. I've aimed for creating it a little more fine-grained than what the YouTube video will show you, but the concept is still the same.
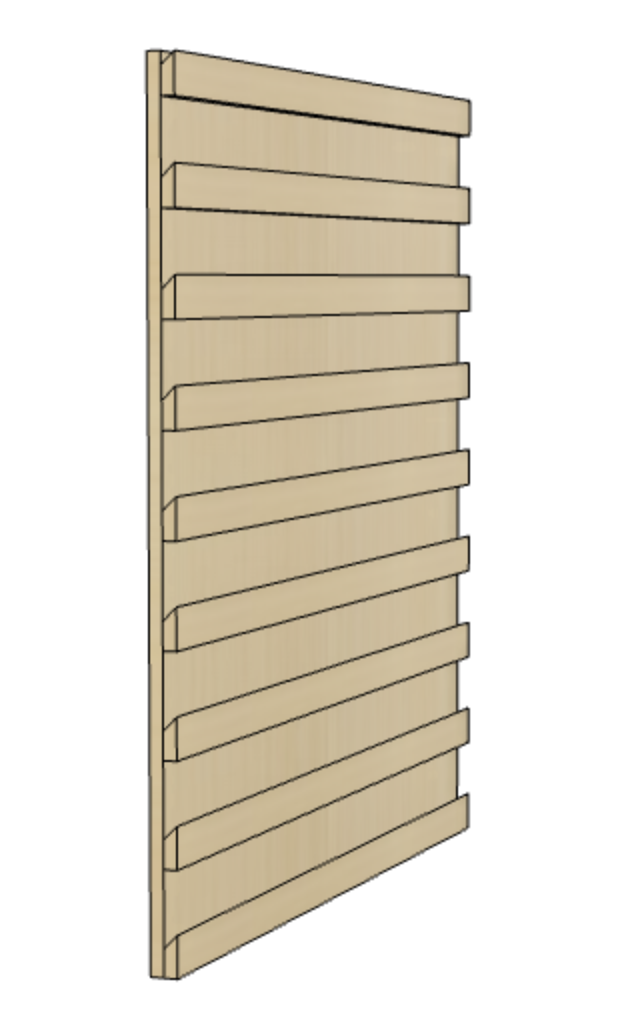
Each tool (or set tools) will then get a custom holder that can be moved around depending on what tools you need for the specific project that one is working on.
Assembly table
An assembly table is always a good thing to have. I'm starting out small and perhaps add a few foldable extensions to it at the sides. I also plan to drill some holes for plugging pins into it and making adjustments to add clamps.
The original though was just to add some legs to the table. But why stop there?

I got an idea from my colleague at work to add some foldable extensions to the table and I went overboard with that idea. The first step was to sketch it up in Fusion 360 and see how large I could make it and still be able to fold it up.

First extension to make it longer.

Second extension to make it wider.

And tada! The entire work area!

This gives a total size of 1755 mm x 1400 mm.
I do need to add legs that will fold into this nicely as well, and also shelves and storage underneath it. The table top will also be prepped for clamps and I might even go as far as to include mounts for a router and a fence that can be moved and clamped. All accessories should be able to be stored in the table itself. There should also be lockable wheels mounted on the legs to move it around to make it adjustable in space as well.
That's it for the first, quick introduction. Most of all will most likely change and each project will be documented separately.


No comments:
Post a Comment