Monday, August 22, 2022

Engraving a duck with a CNC 3018

Several years ago, while doing a lot of electronics, I purchased a small CNC machine from Alibaba to engrave PCBs. Never got the process to work as good as I wanted to so I ended up ordering them from PcbWay instead for like $5 for 10 boards...

But it's a good thing that I bought it because now I can engrave ducks into stuff. I will of course also test the limits of this tiny machine and see if it can cut plywood. I was thinking it would be nice if it could cut router templates for example.

Anyhow, that's the future, now we have a duck to engrave.

Design and prep

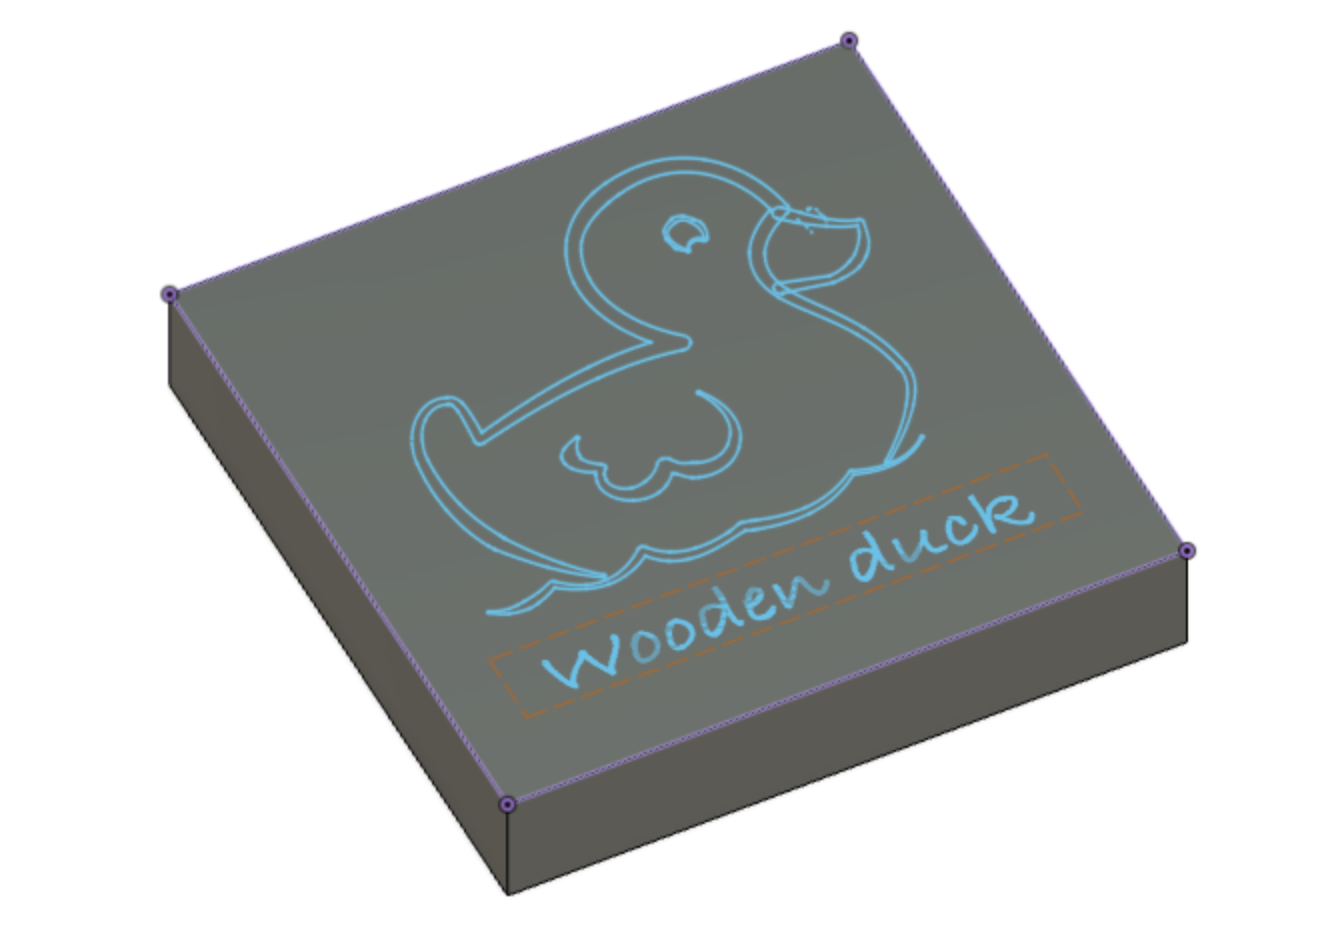
I started out with tracing a duck in Affinity designer. 


Exported it as an SVG and imported it again into Fusion 360. Removed the text path from the sketch and added the text again in Fusion 360 since it messed it up on the way. I'm sure I just did something wrong while creating the SVG, but that was the quick fix.


Not going to deep into this but Fusion 360 has a really cool simulation function where you can edit what tool is going to be used and really see all the movements that the router will take. This saves a lot of time since you can be sure that you at least have the correct program before machining it.


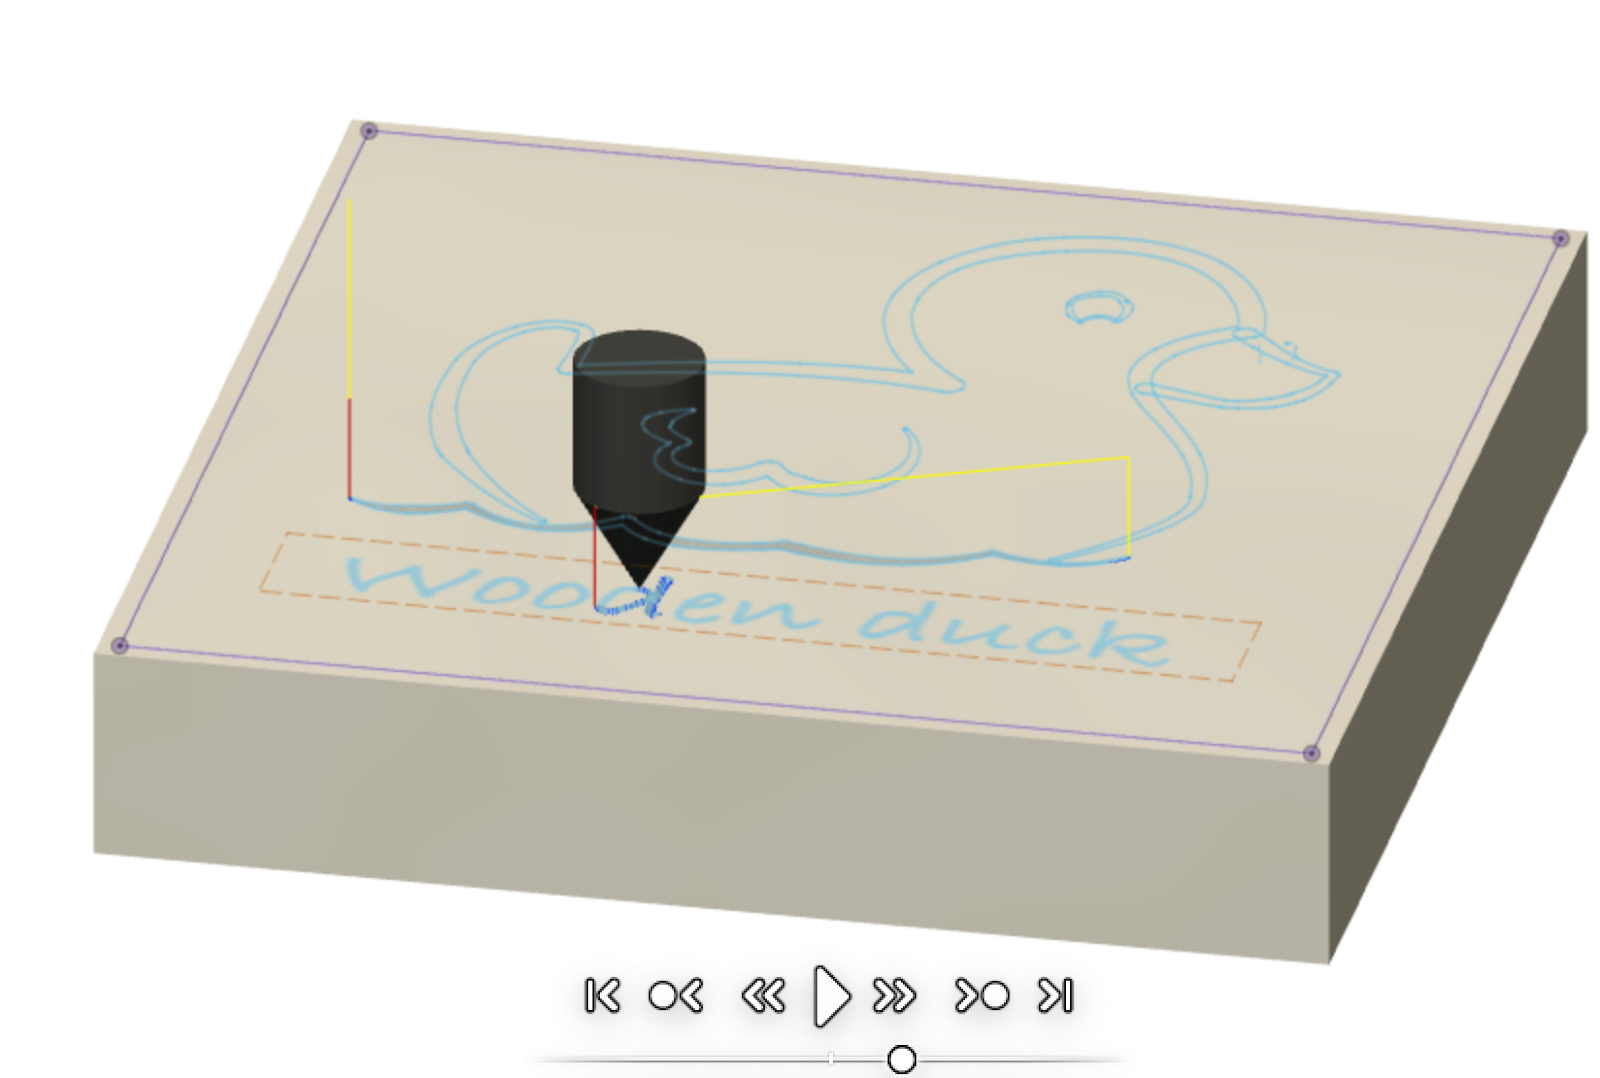
When I was done with the setup and simulation it was time to export it to generic GRBL (a language that my CNC router/controller program understands). A reference of commands can be found at https://reprap.org/wiki/G-code.


Each line is a command, for example G1 Z5 F1000 is to start moving in straight lines, first to position 5 on the Z-axis and with a feed rate of a 1000 mm per minute.

Time to machine

Before setting anything up, I spent an hour cleaning the place up.

I setup a Raspberry PI 3B+ with Raspbarry PI CNC (https://wiki.protoneer.co.nz/Raspberry_Pi_CNC_User_Interface_SD_Card_Image_V5.00) which included bCNC as the control software.


I then exported the nc program (a long list of G-codes) from Fusion 360 and fed it into bCNC. Then I attached a piece of wood laying around that kinda looked flat and just hit run. The first bit plunged into the wood and got destroyed within seconds. After changing bits and adjusting the origin again I got somewhat of a result out of it.


After some trouble shooting I realised the following issues with my CNC router:

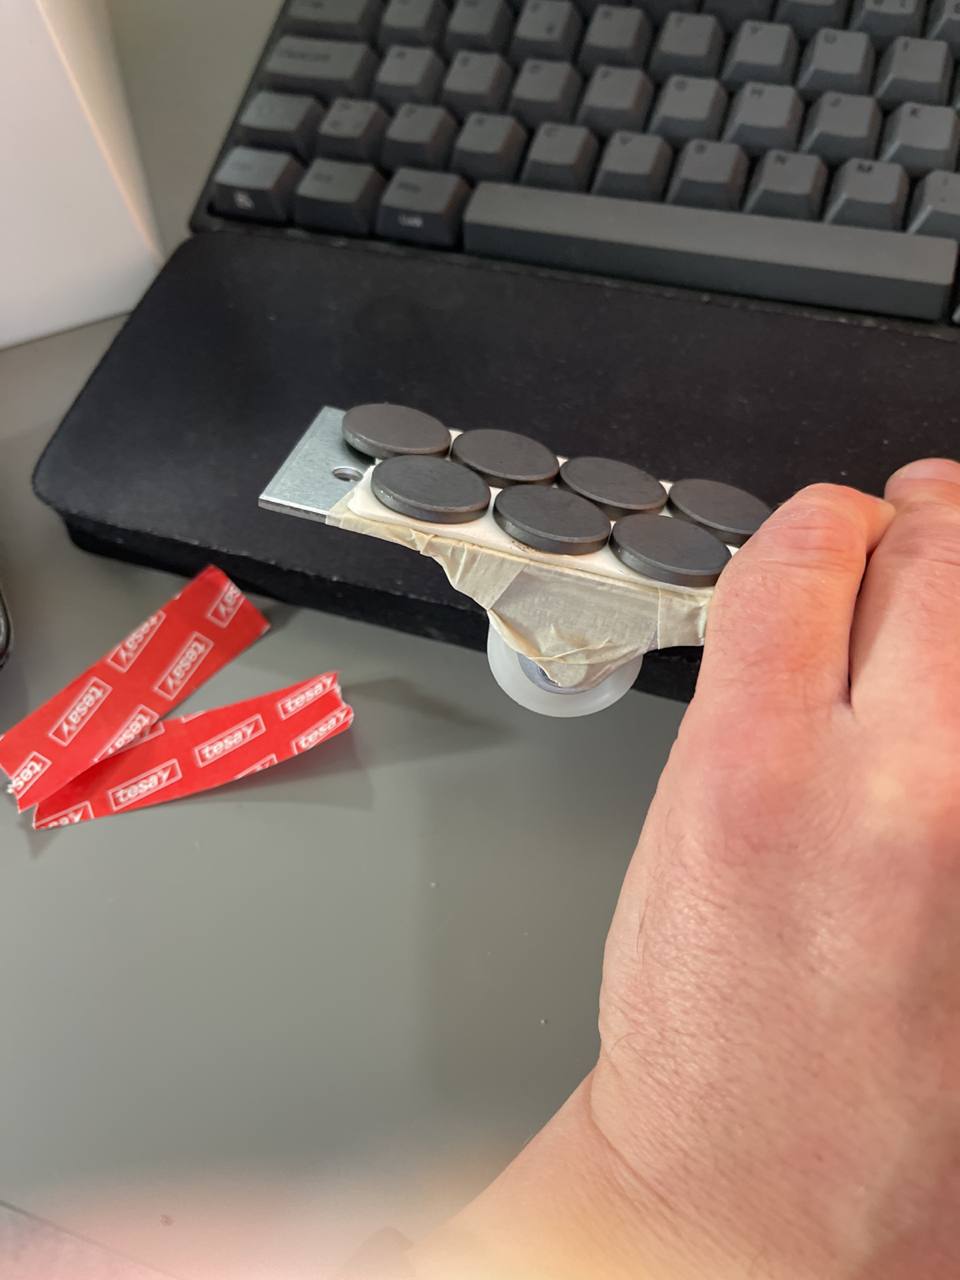
  • The spindel mount is broken, the plastic is cracked, which caused the spindel itself to move slightly in the Z-direction. Not good. To mitigate this, I created a small plywood box that sits tightly around the spindle until I get some replacement parts delivered. Would like one in solid aluminum instead with an interchangeable mount so I can replace the spindle to something more powerful.


  • If engraving and you don't want to flatten the surface, some kind of probing would be nice. I will try to flatten the waste board at least but then I need to sink the mounting screws a bit longer into the board itself first to avoid damaging the bit.
  • There are no end-stops. It would be nice to have in order to be able to auto hone.

End game

The end goal is to create routing templates so that I can use a more powerful handheld router when working on projects. But that's another post for when I've had time to try out my plywood-box-spindle-holder thingy.


Friday, August 19, 2022

The workshop - the initial plan

The master plan is to convert a single car garage into a fully functional workshop. The rough plan is to renovate the workbench, fix a small assembly table (working on the table legs) and organise my tools a bit by building custom designed tool boards.

I'll walk through the top three parts of my project.

The workbench

I bought the workbench from an older gentlemen not far from where I live. He told me that his grandfather used to use it for all his woodworking.

It doesn't have a straight edge at the moment so that needs to be adressed. There are also a few other things that needs to corrected.
  • A hinge needs to be repaired, the wood around the hinge has completely disintegrated so I need to replace part of the hatch to make it work again.

  • A new table top needs to be fitted. I plan to do it the easy way and buy a glued joint board and cut it to size. Still need to do some work below it to make it sturdy and nice. Also the sides needs to be covered in new fresh wood.

  • The drawers below it needs to have some wheels added to make them easier to use. It's a pain in the b*** to open and close them at the moment. There is however not very much space so the need to be sunken into the drawer itself somehow.

  • Both vices needs to be cleaned and lubricated.
And much more...

Tool boards

I got motivated by an unknown YouTuber (that did something like this, https://www.youtube.com/watch?v=4fKBZ-H9StM) on how to create a highly versatile wall tool board. The design is dead-easy, simply a set of plywood strips cut with a french cleats. Each tool holder will the be hangable and moveable as easy as eating ice cream. I eat a lot of ice cream. I've aimed for creating it a little more fine-grained than what the YouTube video will show you, but the concept is still the same.


Each tool (or set tools) will then get a custom holder that can be moved around depending on what tools you need for the specific project that one is working on.

Assembly table

An assembly table is always a good thing to have. I'm starting out small and perhaps add a few foldable extensions to it at the sides. I also plan to drill some holes for plugging pins into it and making adjustments to add clamps.

The original though was just to add some legs to the table. But why stop there?

I got an idea from my colleague at work to add some foldable extensions to the table and I went overboard with that idea. The first step was to sketch it up in Fusion 360 and see how large I could make it and still be able to fold it up.
First extension to make it longer.
Second extension to make it wider. 
And tada! The entire work area!

This gives a total size of 1755 mm x 1400 mm.

I do need to add legs that will fold into this nicely as well, and also shelves and storage underneath it. The table top will also be prepped for clamps and I might even go as far as to include mounts for a router and a fence that can be moved and clamped. All accessories should be able to be stored in the table itself. There should also be lockable wheels mounted on the legs to move it around to make it adjustable in space as well.

That's it for the first, quick introduction. Most of all will most likely change and each project will be documented separately.


Thursday, August 18, 2022

My first order - a simple (?) flower table

In order to play around with some design I asked I close relative if there was any kind of small furniture that she needed. So my first piece of furniture will be a small flower pot table.

I've added a few details to practice on to keep things interesting. The final table might not be as fancy as the design.

The first sketch looks like this.


The dimensions are not set so I'm just working on the main features of the table. Since I will most likely fail a lot, I decided to use inexpensive pine for this project.

The table top

The edge will be composed of six pieces with a mitered edges in a hexagon shape. The inside of that will be small strips of pine either exposing the end wood or long strips of wood, haven't decided yet. There will be a hole in the middle for the legs to attach to the table top. Depending on how rigid it get I might need some support on to bottom of the table top as well. 

The end wood of the legs will be visible through the top.

The ridge

Roughly designed, but I thought it would be something like this. The idea is to have it as one solid piece, but depending on available material, it might be mitered as well. I don't really like small pieces being mitered though. It will attach to the table top by an invisible joint somehow.

The lower table

This piece will be more subtle than the top since it's smaller. It will also need to hold the legs that need to be split inside this piece since they are wider on each side. But it will create an illusion of a continues flow. Again, supports might need to be added below, who knows?


And finally, the legs

Composed of two parts per leg and also joined at the top. The legs will be as mentioned earlier, split inside the smaller table to allow them to be mounted.


Next step

It's an ambitious project for a newbie, I do know that. But the point is to try, not to succeed. There is also no time plan for this since I might need additional tools that I can't afford at the moment. But I'll try my best. The workshop needs to be in a better shape anyhow before starting.


Wednesday, August 17, 2022

Failed attempt #1 at joinery

While building my assembly table I was tempted to try out some joinery. The table I've selected as my victim is an old living room table made out of oak. I need to raise it up to a good working height and also attach some wheels with breaks at the bottom. Finally I'll add a foldable extension area on both sides and some shelfs or cabinets to make full use of the space I have been assigned.

I figured I might as well practice some joinery while at it and see where (not if) I fail and learn something from it.

The goal was something like this:


I decided to only use hand tools in the process and chisel it all out. Sadly I forgot to measure that the top was perpendicular and ended up having to cut one of the pieces of to get it straight. This resulted in an avalanche of other problems so I figured I would use the bad joint as practice target for trying to fix a bad joint with inserts of other pieces of wood.

This is what I manage to accomplish with my current set of skills and tools.


How did I do it? Continue reading! But first a word from my sponsor... Hmm, there is no sponsor... Just read then...

First attempt at fixing a bad joint as practice

So I started out with something like the picture below. I'm not too sad about the result below since it gives me a perfect opportunity to see what can be roughly fixed and what cannot be fixed. The end result means nothing really. It's all about what you learn on the way there.

The mistakes I made in non-ordered lists of WTFs:
  • Bad markings - I scratch my saw marks too deep, future me should use a pencil instead of damaging any wood

  • Bad alignment - I didn't check that the flat surface of the legs was perpendicular to the leg itself, I just assumed it was. Always triple check all angles before starting.

  • Unsharp tools - My freshly bought chisels weren't close to as sharp as they should have been, had to learn how to sharpen them.

  • Bad lighting - I really need to invest in new lights for my tiny space.

  • Different hardness of wood - Oak was a lot harder than my pine. I knew that, but have never really experienced working with them in the same piece. I wonder if this will pose a sanding problem where the pine will be hollowed out more than the oak? (if hand sanding)


I levelled it out as good as possible, still only using hand tools (a chisel basically) and cut some wedges to correct sizes. Glued them in and applied a bit of pressure to avoid the glue from taking up any space. (Which it did anyway).


After letting the glue dry I sawed of any extra wood with a Japanese saw.

The images are from different sides, but you get the idea. The clamp is there to provide some pressure whilst glueing.


Went over it again with a freshly sharpened chisel (don't own an hand planer yet) and sanded it roughly with 120 grit sand paper. I kinda see some light in the end of the tunnel here. This might just be good enough for a wood shop work bench table leg! Of course it needs sanding and love.


I continues the whole way around, one side at a time since. No rush here.

Getting bolder

Cutting the square pieces that goes into the large holes are getting quite straight forward now. It takes a while to get that perfect wedge shape that expands kinda equally over all sides. So I needed to ruin something else and my eyes turned to the join between the pine and the oak at the red square in the image below.

I chiseled out a slightly larger groove and continued on the other side up to the notchy thing.


Clamping it all up, note to self, get smaller clamps or at least more of them. I currently own 4 clamps...


After the glue dried I trimmed of the excess wood using my handy Japanese saw. Note that it has two different set of teeth on either side. One is for cutting across the fibers and the other is for cutting along the fibers.


After a quick cut, it looked something like this. I wasn't to meticulous while doing this since it will be planed and sanded soon.


Still not owning a hand planer, so I grabbed my sharpest chisel and kind of poor-man planed the edges over the entire joint.


Then I couldn't hold myself and ended up hand sanding the joint on this side. First with 60 grit, then cleaning, 120 grit, then cleaning and finally a gentle rubbing with 240 grit... Then cleaning. Those were the three size papers I had lying around, so I used those grits for this test.


Starting to look smooth. But the inlays are of course not pretty. The look just smashed in there so next time I'll take more time on getting the edges and wedges super straight.


And then I grabbed a random bottle of wood oil and rubbed it in. This one made the oak a little bit too dark for my taste. It looks so 80s... I'll be sanding it away again anyhow and try a different oil or a simple clear coating.


Not too shabby for the first attempt (of fixing a failed joint). Good enough for the garage.

The Result

There is a difference I would say at least and I learned a lot as usual from doing this.


What's next?

Machine sanding it, starting with 80 grit, then 120 grit and finally xxx grit. Cleaning the wood with paint cleaner.

And oiled the whole thing with wood oil. Not too picky about what oil to use. It's going to be a garage furniture in the end anyhow.

Reattached the legs to the table.

Awesomeness!

And after that?

The next step is to sand and perhaps plane the table surface as well.


Tuesday, August 16, 2022

Creating a jig for sharpening my chisels

Sharp tools are an absolute must when working with wood. I'm totally new to this, so I'm just fiddling in the dark to find my way of doing it. 

The way I do it is most likely wrong but it does get me to the point of being able to shave arm hair, which seems to be the universal way of telling if something is sharp according to YouTube videos.

Currently I only own diamond sharpening plates in four differents grit values. (200, 400, 600 and 1000 I think). Start by using the 200 grit plate and move your way up to the 1000 grit plate. Only paid about $10 for the plates in total. So no high end stuff here.

For sharpening whilst working, I only use the 1000 grit. If you need to sharpen from a totally dull tool, start at 200 and repeat the steps for each grit value.

I'm also using the plates dry. It seems to work, don't know if this will ruin the plate faster or not. See what works for you.

Flatten the back

The back needs to be as flat as possible. Lay the chisel down on the flat side and move it in an eight-figure all over the plate until you see that some material has been removed, especially at the top of the chisel (aka the sharp edge). Apply a small amount of pressure, but less than you think. The most important thing is to keep it flat.


Any time you sharpen an edge, burr will build up on the other side. This needs to be removed. For the lower grit values a gently flip the chisel over and drag it towards me, with low pressure. For finer grit values I use a piece of soft wood. I guess a strip of leather would be better, but I have no cows close to me at the moment.

The bevel

The cutting side, or the bevelled side of the chisel should be cut in two angles. A long 25 degree angle and a really short 30 degree angle at the top. The reason for this is to reduce the time needed to sharpen your chisel since you only need to sharpen the 30 degree angle. When the short section becomes too long you need to resharpen to 25 degrees and then add a new 30 degree bevel.

The easiest way to get a consistent angle is to buy a jig that ensures that the chisel is meeting the plate at the expected angle. I didn't have a jig so I used some adhesive tape and eyeballed a 30 degree angle. 


I stuck a small piece of wood to another larger piece of wood to create a template so that I didn't have to repeat the process of measuring (eye-balling) for each chisel.


And finish off by removing the burr by gently drag the other side towards you. (This should be a piece of soft wood, so imagine that in your head)!

The result

My arms have never been smoother. For me, this works. It will be fun to see how long the plates last. The end goal is to get some wet stones to compare the results at a later stage.


Improvements

For a future version of this complicated jig I'll try out adding a powerful magnet instead of the adhesive tape. Tape is expensive and it would be a lot quicker to snap on and off the chisel instead. The only question now is to figure out what strength of magnet that would be enough to hold it, but still removable without pulling hard on very sharp chisels.


Monday, August 15, 2022

Yet another blog about wood working!

I'm a newbie wannabe wood worker who is most of all a computer geek. This blog will be all about transforming a tiny space to a wood workshop and all to document all the injuries and mistakes I make along the way!

So far my workspace is a mess since one of the first projects is to fix the workspace. And to do that, I need a flat surface to work on.

Oh, I'm also kinda short on cash so I need to do this smart!

Here's my plan on how to finish step 1 of creating an awesome workspace:

  1. Buy a cheap second hand oak table for about $10. (Done)
  2. Extend the legs in a complicated way to make it high enough to use. (In progress).
  3. Fail at creating nice joints... Try again (Currently iterating this step).
  4. ?
  5. Awesomeness, I can start on refurbishing the 100 year old workbench. I'll put together a separate post about that.


Other side projects

I'm fiddling with a simple vacuum cleaner system to attach my tools to. It will have a separator for any chips of wood and 3d printed valves to control the flow of air.

To model the 3d printed valves, I use Autodesk Fusion 360. (did I mention that I'm a computer nerd)


One very important lesson is that you need insanely sharp tools when working with oak. Initially I freehand sharpened all my chisels. Works OK, but a jig would be nicer. So I prototyped this together:


It's basically a flat piece of steel with magnets and some wheels on it. This will allow me to get a consistent angle while sharpening my tools. Eventually I might purchase a grinder thingy for this, but as I said, money is kinda tight at the moment and I really want to learn to do it the manual way first.

That's it for the first post. Thanks mom for reading this. I'll focus on providing some more content on the current mess that I call the workshop and what my plans are and how I did it!


Engraving a duck with a CNC 3018

Several years ago, while doing a lot of electronics, I purchased a small CNC machine from Alibaba to engrave PCBs. Never got the process to ...